
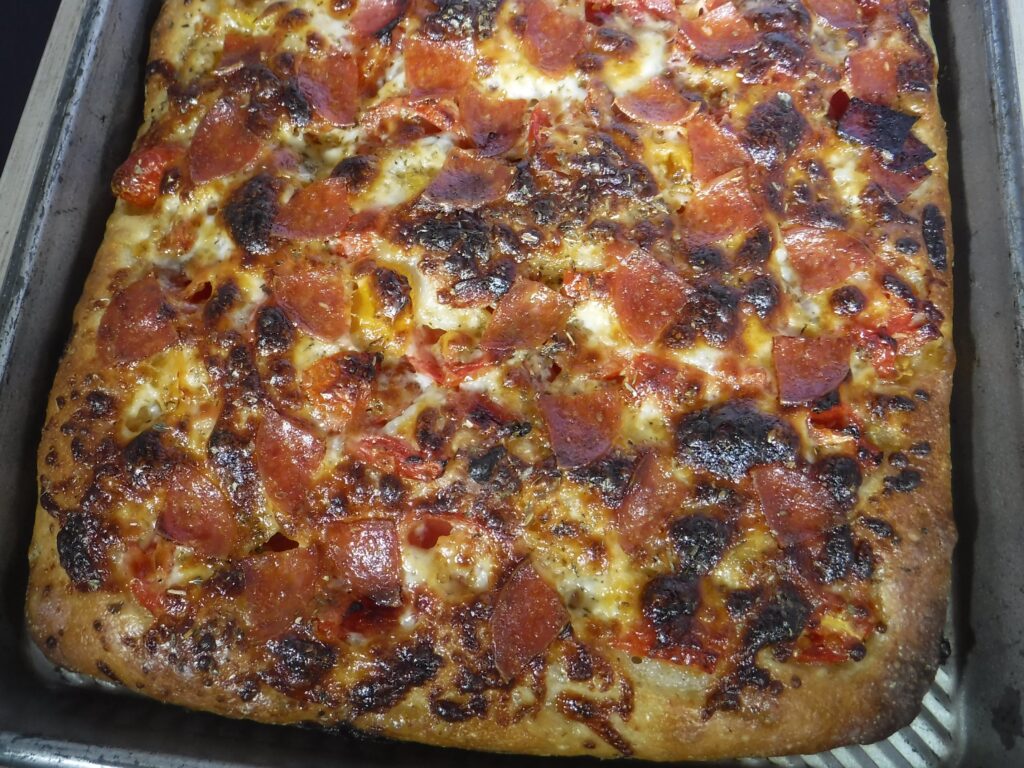
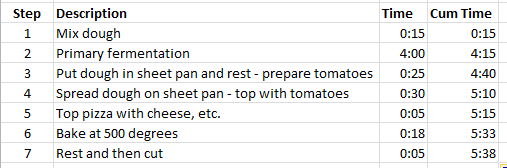
An unusual way to make pizza dough was the cover article in the Sept.-Oct. issue of Milk Street Magazine, and I made it to general acclaim for a family dinner last night. It combined a very light crumb with a crunchy bottom surface. This is an unusually high hydration dough, which requires some changes in handling and topping, but is not hard to make. I made a 1-1/2 recipes (a half sheet and a quarter sheet) for 6 people. Whether or not it is ultimately precisely necessary, the recipe has a number of timed rises and rest periods, so there is a need to use a timer. I have summarized the key steps in the following table:
Here are the quantities for a half sheet pan (4 servings)
400 g. bread flour (also worked well with 200 g. Flourish high fiber AP flour and 200 g. KAF high gluten flour)
2 tsp. sugar
1.5 Tbs. yeast (2 packets)
1 Tbs. kosher salt
1.5 cups lukewarm water
3 Tbs. olive oil, divided (plus more to grease hands
Cooking spray
1 lb. cherry tomatoes
6 oz. whole milk mozzarella, grated
1 tsp. dried oregano
Pepperoni or other low moisture toppings
In the bowl of a stand mixer, mix together the flour sugar and yeast. Add the water and using the dough hook on low speed mix the dough for 5 minutes, stopping once or twice to scrape the bottom of the bowl to make sure all the flour is incorporated. Add the kosher salt, and mix with the dough hook on medium speed another 5 minutes. Coat a large bowl with 1 Tbs. of the olive oil and mist a spatula with cooking spray. Put the dough in the greased bowl and cover with plastic wrap. Allow to rise 4-5 hours on the countertop. The dough will rise, fall, and rise again during this time.
Mist a half sheet pan (13 inch x 18 inch) with cooking spray and then put a Tbs. of olive oil in the center. Gently scrape the dough onto the half sheet pan on top of the olive oil. Allow to rest in the pan for 20 minutes.
While the dough is resting, cut the tomatoes into halves or quarters (depending on their size), and mash them a bit with a potato masher. Put them in a colander to drain. The object is to reduce the moisture of the tomatoes. When done, toss the tomatoes with 1 Tbs. of olive oil.
Oil your hands, and gently spread the dough to cover the pan. It is OK if the pan is not completely covered. Gently spread the drained tomatoes on the dough and rest for 30 minutes. Preheat the oven (including a baking stone or steel) to 500 degrees.
Add the grated mozzarella and then the dried oregano. Top with pepperoni or other low moisture topping. Bake for 18-20 minutes, until golden. Remove to a wire rack and allow to cool for a few minutes before cutting and serving.
How many times have you used this recipe? Have you made changes? Do you always use cherry tomatoes or have you tried pizza sauce? I’ve been eyeballing this recipe for ages and I’m excited to finally be trying it tonight. I’m hoping it will be a keeper; the concept seems very simple. I have a 7 person, pizza loving family, so I’m hoping two half sheet pans will be enough. I have two strand mixer bowls and plan on making one batch in each. Wish me luck!
I think I have made it twice. My wife is not a great fan of pizza, so I make pizza less often than I would like. She does like this particular version because she likes the crust. I have only used cherry tomatoes. I suspect that sauce would be too moist for the high hydration dough. If you do make a batch with sauce, I would be interested to learn how it turns out.
I don’t have a scale . Would you translate the measurement for flour ? Thanks
I use 4.33 oz. per cup. (Thus 13 oz. = 3 cups.) When I use volume measurements I first fluff the flour and then scoop and level. I attended baking classes at King Arthur Flour in Vermont, and each class began with a demonstration that the amount of flour in a cup can vary quite a bit depending on how packed it is. I also find it a lot quicker to measure flour by weight, especially when I am scaling recipes up or down. Lately I have frequently made 1/4 recipe of the Druze Mountain bread so that there is just enough for two people.
Good luck. I would like to hear how the recipe works for you.
Thanks for sharing:)
Really good and simple way to make focaccia. However, the recipe makes a lot for a half sheet pan. Mine came out really thick! If you like a less bready/carby crust, divide in half.
I wrote down what Cristopher Kimball said on his video. He used 200 g flour, 2 tsp. salt, 2 packages of yeast. Mixed it well and added 3/4 cup of water. However, the water was not enough, so I added probably another 1/4 cup. The dough is rising now and I hope it turns out.
I would be interested in learning how your pizza turned out. Are you making 2 servings? That would be consistent with 200 g. of flour and 3/4 cup of water. For 2 servings, 2 tsp. of (kosher?) salt and 2 packages of yeast sounds like too much. You might also enjoy the Sicilian Pizza with Peperoni and Spicy Tomato Sauce recipe on the blog, which is also a fairly high hydration dough.
I have made this recipe multiple times. It has spoiled me for any other pizza. I plan to make the recipe today as focaccia to go with soup. It will be topped with extra olive oil, pine nuts and Parmesan. There is a Milk Street tomato sauce that we use when we are making the pizza since good tomatoes are hard to find much of the year. I just put some olive oil in a frying pan, add a can of tomato paste and cook it while stirring for a bit, then add some red wine and oregano and cook it a bit more. It makes a fairly dry sauce that can be carefully spread on the delicate pourable dough. I use the back of a flexible silicon spoon to spread it.
The pourable recipe is OK! Could it be, or does it need to be, altered, to pour it into a 9” X 5” loaf pan to bake loaf of (sliceable) bread?
I don’t know. Why don’t you try it and post a comment about the results. Something I have done frequently is to put pizza dough in a small pan, like a quarter sheet or an eighth sheet, and let is rise a lot in the pan to become thick enough for a good foccacia.
I’ve made this dough more than 20 times….I par bake for about 10 minutes,cool for 30 minutes and then dress with your favorite toppings.Bake for about 10 minutes more.
Does anyone know if this dough can be frozen?
I have never tried to freeze the dough.
If you try freezing and it works well, please post a comment to that effect on the blog. Good luck.
Yay. Glad I found your website. I can do a pretty good pizza dough but mine never quite have the chew I’m looking for. This one is appealingly easy so will give it a try. Thanks!
I tried this recipe, which I believe was featured on the “New Wave Pizzas” episode of “Christopher Kimball’s Milk Street” several times over the past few weeks with a few variations, to see if I could get it to suit my preferences. TLDR> I couldn’t 🙁
The good: It’s easy. REALLY EASY. There’s no kneading to speak of, since the hydration and long sit time do most of the work of the gluten formation, and you really don’t even have to use a machine. All I needed to make the “dough” was a large mixing bowl, a large spoon, and enough time in a warm kitchen to allow the mixture to rise, fall, and then rise again. It also smelled marvelous.
The bad: It’s not so much a pizza as it is a focaccia with pizza toppings, which I should have guessed since it’s pourable — more like a thick batter than a proper dough. It’s bread-y rather than chewy, even more so than a typical Sicilian pizza. It also didn’t have the flavor of a cold-fermented dough. None of that is necessarily a bad thing, it’s just not pizza to me. I’m going to try to use just the dough (i.e. no sauce or cheese) to make cubes of bread for fondue and/or panzanella salad; I suspect it will be terrific for those.
Tips:
* For the first few times, weigh out the flour and water (400 gm flour, 355 gm water). You’ll still need to make small adjustments, depending on humidity and other factors. Watch the Milk Street video (available on PBS Passport in the U.S. and YouTube globally) to get a sense of what the batter should look like. If it’s too dry, add a tsp. of water; if it’s too wet, add a bit of flour. Eventually, you’ll get a sense of what’s right and you won’t have to weigh things out.
* Use a cast-iron fry pan instead of a half-sheet pan. The cast iron won’t conduct heat as well as the metal of the sheet pan, but it retains heat better. You’ll need to reduce the recipe by about half (depends on the size of your pan). The tall sides of the fry pan also help for the next tip…
* Use two cheeses. First pile up shredded Monterey Jack on the sides of the pan, and then cover the rest of the dough with mozzarella. The fried cheese (frico) on the edges of this pizza is amazing! This tip is blatantly stolen from America’s Test Kitchen’s Dan Souza. 🙂
* Notice I mentioned cheese before tomato sauce. This is because in my best variations, I put the sauce ON TOP of the cheese, like in a Detroit-style pizza. Doing that prevented the sauce from making the already wet dough too wet to bake properly.
* I didn’t have cherry or grape tomatoes on hand, so I tried two different uncooked sauces. The first was just diced tomatoes from a can, drained and crushed lightly. I had ones already seasoned with oregano, basil, and garlic so I didn’t add those herbs. If I had just plain diced tomatoes, I would add those seasonings. The second was the same canned tomatoes as the first, but blended in the can with an immersion blender. Both worked out well, but if you’re going to use the wetter, blended sauce, definitely put it on top of the cheese, and don’t use too much.
* Salt. Most of the written versions of the recipe don’t mention this, but in the Milk Street video, Chris Kimball makes a point of sprinkling salt on the pizza. I think that’s important to help bring out the flavors. When I didn’t do that, the pizza came out too bland, and I wound up salting the pizza anyway when eating it. And I’d rather put the salt ON the dough after the yeast has done most of its work vs. IN the dough while mixing it (as my understanding is that too much salt can inhibit yeast activity).
* Be generous with the olive oil used to coat the pan, and use a decent quality one (but not a EVOO meant to be used uncooked on salads or other raw foods). It’s important to use enough, both to ensure that the pizza releases from the pan and also to help the bottom crust fry properly. This is not a recipe for dieters.
* “Toppings”… none are necessary (imo the crust and the cheese should be the stars of a pizza), but if you must have them, don’t put them on top. Instead, you can put them directly on the dough under the chesse, or over the cheese and under the sauce. I like Kalamata olives and mushrooms, minced fine and pressed lightly into the top of the dough. Slices of dried plum tomatoes are also good.
But even after applying all these tips, I still couldn’t get the chew or the flavor of a “real” pizza. The best I could do is a pizza-flavored focaccia. There’s nothing wrong with that — a local market does very good business making them — but for my time and money, I’d rather make Peter Reinhart’s “Perfect Pizza at Home” (available for free on Craftsy). It requires a bit more effort to do (but it’s still very easy), and a few more hours of waiting (overnight cold-fermentation vs. 5 hours on the counter), but you get a wonderful soft and supple pizza dough that is a joy to work with and much more flavorful than this one. An added bonus to Reinhart’s lower-hydration dough is that the “slap and fold” technique for working it is a LOT OF FUN!